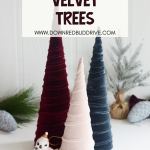


These DIY Velvet Trees are the perfect way to add elegance to your Christmas home decor this year! They’re an easy DIY Christmas project anyone can make!

This post may contain affiliate links. See my full disclosure policy HERE.
If you’ve read any of my posts before, you know I love my homemade stuff to look like it’s store bought. Making Christmas decor for a fraction of the cost of store-bought is not as hard as you think!
These velvet trees are absolutely stunning and can be made in just a few minutes. Kids can even help with this one, if they are old enough to safely handle a hot glue gun!
These are made very similarly to my flannel trees, and my leopard trees, and the method works SO perfectly for these velvet trees! There’s a few other things you need to keep in mind with velvet trees, so read on to get the tips and tricks to make these perfectly every time!
How do you make these DIY Velvet Trees?
Step 1: Gather your supplies.

You will need:
- Paper Mache Cone Trees
- Velvet Fabric
- Hot Glue Gun
- Scissors
Step 2: Cut your fabric into strips.

The amount of fabric you will need for this project will depend on how many Velvet Trees you’re making and the size of the cones you’re using.
I used 8″, 10″, and 12″ trees for this project. I used a different velvet print fabric on each one just to mix it up.
A quarter of a yard of fabric would have easily done all three cones.
Cut your fabric into 1″-2″ wide strips for the length of the fabric. I needed anywhere from 2-3 long velvet strips to do each cone.
Step 3: Glue on the fabric to the cone.

Start at the bottom of the cone and use a hot glue gun to attach the fabric to the cone.
Let the fabric overlap a bit on the bottom of the cone to ensure full coverage. When you’re done, you can go back and glue the overlapping fabric to the inside of the cone.
Place a line of glue, and then wrap the fabric, making sure it slightly overlaps the fabric row before it. It will bunch and roll a bit, but that’s what it’s supposed to do. Let it happen!
Continue to the top, using a new strip of fabric as needed.
Once you get to the top, trim off the excess, and glue down the small bit at the tip of the cone.

When it’s finished, this is what your DIY Velvet Trees should look like! They’re very easy and forgiving, and teens could easily do this craft with little to no assistance!
Tips and Variations for your Velvet Trees:
- Fabric. If your fabric is stretchy, stretch it some as you glue it on the cones, but don’t stretch too much or it won’t attach well.
- Colors. Choose different colors of velvet, or keep them all the same. Go wild and get pinks and blues or reds and greens!
- Size. You can find sets of multiple sizes of these trees on Amazon here, or you can get them on Hobby Lobby’s website too!

Want more DIY Christmas ideas?
-


CLICK HERE -

CLICK HERE -

CLICK HERE -


CLICK HERE
- DIY Leopard Christmas Trees – These DIY Leopard Christmas Trees are so easy to put together!
- Sea Glass Christmas Tree DIY – If you want a beautiful beach-inspired piece of Christmas decor, you need to make this gorgeous Sea Glass Christmas Tree DIY!
- DIY Wood and Fabric Christmas Trees – These beautiful DIY Wood and Fabric Christmas Trees are super easy to make!
- DIY Flannel Trees – Make your Christmas decor cozy this year with these DIY Flannel Trees!
These DIY Velvet Trees will be your new favorite Christmas decor this year!