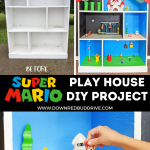


Recently I turned an old house-shaped bookshelf into a DIY Super Mario Play House for my girls. It turned out really cool, so I documented the whole process, so you can make one too!

This post may contain affiliate links. See my full disclosure policy HERE.
I won’t lie to you, this took me so long to do. Not only was there a lot of painting, but I had to plan out what I wanted to do in each “room” of the DIY Super Mario Play House too.
There was a lot of researching, and measuring, and overall I’m SUPER (no pun intended) happy with how it turned out! My girls love it too!
How do you make this DIY Super Mario Play House?
Step 1: Gather your supplies.
You will need:
- House Shaped Bookshelf (easily found on like Facebook Marketplace)
- Acrylic Paint
- Clear Spray Paint
- 1 1/4″ PVC Pipe
- 1 1/4″ PVC Couplings (I had to cut mine in half to be the right length)
- Super Mario Characters (I ordered these on Amazon)
- Princess Peach Castle Set
- Super Mario Dungeon Play Set
- Super Mario Underwater Play Set
- Super Mario Dungeon Add-On Set
- Wood Glue
- Paintbrushes
- White Latex Paint
Step 2: Clean the bookshelf.

I had been looking for one of these book shelves for a long time, and they’re SUPER easy to find on Facebook Marketplace or yard sales etc, but I’m CHEAP and didn’t want to spend much on one.
This one was PERFECT, but it definitely needed some TLC.

Cleaning before you paint is SO IMPORTANT. Dust with a clean rag first, then use a good cleaner to scrub all the dirt off.
Let it dry completely before painting anything.

My bookshelf had seen some things, so I also needed to sand off some paint drips to make sure I had a smooth surface to work with.
Step 3: Paint the first coat.

I used a white latex interior paint to paint the whole house first. Acrylic paint would have taken 400 coats to cover all those paint streaks and blemishes, so latex paint was going to give me a good base.
The inside of the house only took one coat since I was covering each room with color and the white was just acting as the primer, but the outside took two coats.
The acrylic paint will take 2-3 coats of paint for each color. The above picture is what it looks like with one coat. Use a fine-bristled brush for the smoothest coat possible and the best results.
Let it dry about 30 minutes to an hour in between each coat. This is why it takes so long to make this DIY Super Mario Play House.
Step 4: Make the warp pipes.

I absolutely wanted to make sure I included the classic warp pipes when I made this DIY Super Mario Play House. The 1 1/4″ PVC pipe was just the right size that the toys wouldn’t fit all the way in, so I went with that size.
I cut the pipes to 4″, and fitted 1 1/4″ couplings onto the tops. My couplings were too long, so I had to cut them in half to make them the right length for the look I wanted.
Pro Tip: Use an electric saw to cut the pipes to make sure they’re even and will stand straight up when you glue them into the house.
Step 5: Paint the warp pipes.

I used acrylic paint (cheap $0.50 bottles from Walmart) and a fine bristled paint brush to paint the warp pipes. I ended up doing two coats.
I coated them in clear spray paint to seal them when they were dry.
Step 6: Glue in the warp pipes.

Once I was completely finished painting my DIY Super Mario Play House, I was ready to glue in the warp pipes.
I used Gorilla Wood Glue, put a layer of glue on the bottom of the pipes, and placed them in the house. I used a book to sit on them for the next hour to hold them down while the glue dried.
I did the same thing with the brick block and question mark block in the bottom right room. So this process took a couple of hours simply because of the dry time.
Pro Tip: Even though this glue dries in about an hour, it does take 24 hours to cure, so don’t let the kids play with it until it’s been that long.
I used the Boo and the two coins that came as part of the play sets I ordered (they’re just cardboard) as well. I just used hot glue to glue them to the back walls.

This is what it looks like after all the rooms are painted and the pieces are glued into place.
Step 7: Put in the play sets.

These are all the play sets I got to make this DIY Super Mario House awesome. It’s the most expensive part (I spent like $100 on all of this), BUT I knew my kids would play with it over and over, and the rest of the house only cost me about $10 total, so it was worth it.
I figured if I’ve spent $100 on a Barbie house they never play with, this was worth it!
I used the Princess Peach Castle Set, the Underwater Set, the Dungeon set, and the Dungeon add-on set. I also ordered some Japanese knock-offs of Mario characters so they would have a bunch of characters to play with in the Mario play house.
Officially FINISHED DIY Super Mario Play House:

This took so much time, work, and planning and I’m so HAPPY with how it turned out!
As you can see, I split the play sets up to match what I wanted each room to be. I didn’t glue any of the play sets in place so they could be moved and played with as needed.

I wanted to make sure there was a flag room, as that’s the best part of the end of a level in Super Mario! I painted the floor green, and the walls and back blue for this level. I added a couple of free-handed clouds to give it the classic Mario look too.

Can’t have a DIY Super Mario Play House without having a dungeon level room! I used the Dungeon play sets here, as well ass the fire Mario.
I painted the floor a slate grey, and the walls and back black.

Here’s how the warp pipe room turned out! I painted the floor grey and the back and walls black, because the warp room I remember was in an underground level.

I wanted to make sure I had a classic Mario ground level, so that’s what this room is supposed to represent. I glued on the blacks from the castle set into this room.
I painted the back and walls blue and the floor green, and then free handed some clouds as well.

For the under water level I painted the back and walls blue, and the floor a light tan to represent sand.
I used the underwater toy set here. I also glued the gold coins that came with this set (part of the display packaging and just cardboard) onto the back wall as well.

The room with Princess Peach’s Castle was my favorite! The play set just comes with Bowser, so I used the Princess Peach that came from the big bag of characters I bought here.
I painted the walls and back blue, and the floor green. I free handed some clouds as well, and they ended up perfectly fitting around the castle shape!

All in all, I’m SUPER happy with how this DIY Super Mario Play House turned out, and my kids haven’t stopped playing with it since!
Want more DIY projects?
-


CLICK HERE -

CLICK HERE -


CLICK HERE
- Nintendo Party Theme – This DIY party theme is perfect for the Nintendo lover in your life and comes with lots of free printables too!
- Layered Painting Bookshelf – This is another Facebook Marketplace furniture piece I found and turned into something awesome for my living room! In this post, I show you how to achieve the layered painting technique I used.
- Minecraft Block Craft – This DIY Minecraft project is simple to make and is a great activity for your kids, or is awesome DIY Minecraft Home Decor too!
If you decide to make your own DIY Super Mario Play House, I hope your kids love it as much as mine have!