

This post is sponsored by Sola Wood Flowers, but all opinions and tutorials are our own. For more information, see our disclosure by clicking HERE.
Weddings can be expensive. Besides being expensive, it can often be difficult to find exactly what you have in your brain, so sometimes it’s best to just make it yourself! Doing your own flowers doesn’t mean you have to have sub-par floral at your wedding. There are so many options to choose from, that you can have high-quality DIY easily!
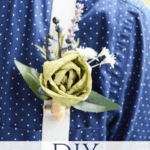
Recently we discovered Sola Wood Flowers, and these things are amazing! We wanted to order every item they had on their site, but since we were shopping to make this DIY Wood Flower Boutonniere, we grabbed the 1.5″ Lotus flowers to be the star of our bouts. Since they have their own dye, you can pick whatever color you want. We chose Avocado Green, and the color was PERFECT for what we needed!

Dying these flowers was a lot more simple than I thought it would be. You just mix the dye with a little water, until you achieve the color you want. Whisk the dye until the water and dye form one smooth color.

Hold the flowers between your fingers, and just dip them in. Shake off the excess liquid carefully, and then set them on a cooling rack to dry. One dip was plenty of color (as you can see in the final pics) and it absorbed the dye super well!

We left ours to dry overnight for our DIY Wood Flower Boutonniere and that worked great. You could probably get away with a couple of hours if you’e on a tight time crunch, but overnight is best.

We had a lot of floral to pair with the boutonniere, but we wanted to make sure we picked just the right accent flowers. We laid them all out, and just played with them for a bit. Don’t tape or glue anything until you’ve put everything together and know that it’s the look you’re going for.

We knew we were going to make our dyed wood flower the star of our DIY Wood Flower Boutonniere, so we needed to wire it so we could move it as needed in the design. I used thin floral wire, and wrapped it around the very base of the bloom. Then I twisted it like a bread tie around the base of the flower, so that it stayed secure.

We decided to use a sprig of lavender, a small bunch of the blue berries, a sprig of the white mini flowers, and three leaves. One of the leaves was a fun spiky accent leaf, that we centered in the back, and the other two were a darker color to give the piece dimension. We wanted our Sola Wood Flower to be the feature flower, so it was right up front. Once we had it laid out the way we wanted in our hand, we were ready to tape it all together. Use floral tape (the green kind) and one floral stem at a time, hold and twist the tape around it. Be sure to stretch the floral tape as you’re wrapping, so it’s sticky. Wrap the tape with one hand, and hold the DIY Wood Flower Boutonniere between the thumb and forefinger of your other hand.

Not everything will always be able to be taped on for the best look. The dark accent leaves weren’t going to work well if they were taped, so we used floral adhesive to attach them. Do this after you’ve wrapped everything else, because it will need to sit overnight before the next step.

I used a couple of straight pins to hold the leaves in place while the glue dried. That worked very well, and the leaves stayed in place. To finish ours off, we used a ribbon and wrapped it around the base of our DIY Wood Flower Boutonniere. Some people like to leave just the green floral tape, so that it looks like a stem, but I like to use a ribbon or something similar to wrap the stem, as I feel it gives it a more finished look.
That’s it! That’s all you need to make your own DIY Wood Flower Boutonniere! Go check out Sola Wood Flower’s website and see all of their awesome floral and craft options! We were really surprised at the texture of the flowers. They’re so thin and pliable, not stiff as I expected they would be. These would be great for all kinds of DIY projects, wedding floral, home decor and more!
If you liked this post, go check these out too:
101 Ways to Save on Your Wedding
Hymnal Bouquet Tutorial
How to Turn a Wedding Dress Into a Bridal Bouquet