
Easter is such a fun time to make adorable little treats for the kids, like these Easter Bunny Treats! These ones are especially easy because you only need to cut out a printable and add a little glue! I did all the hard work of designing the printable and testing the sizes of the plastic bubbles to make this a super easy Easter craft for you!

This post may contain affiliate links. See my full disclosure policy HERE.
You can get the printable for free below, and you can also print out the instructions for this Easter Bunny Treats DIY at the bottom of this page if you want to save it to make later too. These look SO cute in an Easter basket, or they would be a great stand-alone gift or treat too.
Easter Bunny Treats
You will need:
Free Printable Bunny Templates
Clear Plastic Ornaments 50mm size (I used these from Amazon HERE)
M&M’s (Easter ones look the cutest, or you can use jelly beans, or any small little candies)
Pencil
Hot Glue Gun
Scissors
The printable bunnies for these print out with three different ear colors: pink, blue, and yellow. They print three bunnies to a page one of each color. This is great for multiple kids, or just mixing up colors. Print these out on cardstock for the best results.
Print out the bunnies, and cut them out of cardstock. Then, take one half of the clear plastic ornaments, and gently snap off the notched piece where you could place the ornament hanger.

The BEST way to make these Easter Bunny Treats without messing them up (like I did 1,400 times before I finally got smart), is to trace the ornament lightly with a pencil so when you go to glue it on, you get it in the enter of the bunny’s belly every time.
WANT SOME MORE EASTER TREATS YOU CAN DIY? SEE ALL MY IDEAS HERE!
Fill the half of your ornament about 4/5 full of M&M’s. Then run a very thin bead of glue all around the rim of your half sphere ornament. Quickly place the bunny on top lining the ornament half up with the circle you traced on the bunny. The best way to do this is to hold the ornament in your hand slightly above eye level, and then to place the bunny cut-out on top.

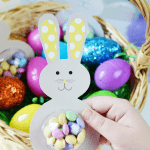
When your Easter Bunny Treats are finished, they should look like this! They look super cute in Easter baskets nestled in with plastic eggs, or you could give them as a stand-alone treat as well. Either way, they’re a super simple way to dress up a plain old bag of Easter M&M’s, don’t you think?

The shapes are super simple to cut out too, so you don’t need to worry about having top-notch cutting skills to make these look good either. My kids loved these little bunnies, and I think they turned out pretty cute! You can get the printables for these Easter Bunny Treats HERE. Check below to print the instructions to make the later.

Easter Bunny Treats
These adorable Easter Bunny Treats are so easy to make. The free printable bunnies make these the easiest Easter DIY you’ll ever make!
Materials
- Free Printable Bunny Templates
- Clear Plastic Ornaments 50mm size (I used these from Amazon HERE)
- M&M’s (Easter ones look the cutest, or you can use jelly beans, or any small little candies)
- Pencil
- Hot Glue Gun
- Scissors
Instructions
- Print out the bunnies, and cut them out of cardstock.
- Then, take one half of the clear plastic ornaments, and gently snap off the notched piece where you could place the ornament hanger.
- Trace the ornament lightly with a pencil so when you go to glue it on, you get it in the center of the bunny’s belly every time.
- Fill the half of your ornament about 4/5 full of M&M’s.
- Then run a very thin bead of glue all around the rim of your half sphere ornament.
- Quickly place the bunny on top lining the ornament half up with the circle you traced on the bunny. The best way to do this is to hold the ornament in your hand slightly above eye level, and then to place the bunny cut-out on top.
Notes
The bunnies print three to a page in three different colors.
If you don’t want to use M&M’s, you could also use jelly beans or any kind of small candy.