


Turn empty embroidery hoops into these super cute Embroidery Hoop Pumpkins in just a few minutes! They make the cutest fall wall decor and are totally customizable!

This post may contain affiliate links. See my full disclosure policy HERE.
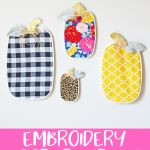
I love coming up with fun and unique ways to decorate my house. Holidays are one of my favorite things, and decorating for the changing seasons is a must for me. My house is full of bright, fun color, so when I made these Embroidery Hoop Pumpkins (just like when I made these stuffed, no-sew pumpkins) I used funky patterns and colors. Rest assured, you can use whatever colors and patterns fit your home the best!
Get all the supplies I used to make these Embroidery Hoop Pumpkins on this supply list HERE.
How do you make Embroidery Hoop Pumpkins?
Step 1: Pick your fabric.

As I said earlier, I chose crazy fabrics that still had a fall feel to them, without being traditional. You could easily make these all orange, or cream, or neutral colors if the bright patterns and colors aren’t your thing.
I found the big rectangle embroidery hoop set on Amazon HERE. They’re sturdy and plastic and are really good quality. If you use that set of embroidery hoops for your Embroidery Hoop Pumpkins, keep in mind that your largest embroidery hoop will need just a touch more fabric than 1/4 yard.
Step 2: Put the fabric in the EMbroidery Hoop Pumpkins.

Lay the inner hoop on a flat surface. Lay the fabric on top of that hoop. Make sure your pattern is facing the direction you want it to. Iron your fabric first, if need be, to make sure there are no wrinkles.
Place the larger part of the embroidery hoop over the top of the fabric, and then tighten the screw to secure the fabric in place. Before you tighten the screw all the way, make sure your fabric is pulled tight in the hoop without wrinkles.
Step 3: Cut out the stem.

Using this printable template you will need to cut out the pumpkin stem. I designed this template to match the bigger pumpkins, and then just freehand cut the stems for the smaller pumpkins. I printed the template onto sticker paper to make it easy, and it worked great.
I used fake gold leather that’s generally used for making hair bows to make these stems and LOVE the glam look it gives these. They have lots of colors and patterns to match whatever theme you choose for your pumpkins. I found mine at Hobby Lobby, but you can get it on Amazon HERE.
Switch between putting the stem on the front of the leather fabric, and the back, to get stems facing opposite directions.
Step 4: Make the stem stiff.

The fake leather stem by itself is a little floppy. I remedied this by taking a small piece of floral wire and hot gluing it to the back. This was super helpful and worked great. Let it dry completely before moving to the next step of making your Embroidery Hoop Pumpkins.
Step 5: Attach the stem to the Embroidery Hoop Pumpkins.

Use hot glue and attach your stem to the top of your Embroidery Hoop Pumpkins. Make sure you attach the stem to the same side as the tightening screw, because we’re going to hide that with a leaf.
Step 6: Add the leaf.

Use a leaf of your choice (I found the fun velvet leaves at Hobby Lobby) and glue it on top of the stem. Remember the point of the leaf is to hide the tightening screw, so make sure to get a leaf big enough to cover it, and position it to cover it when it’s glued.
Step 7: Attach the bow.

Use raffia to tie a bow and then hot glue the bow to the top of the pumpkin. I used bigger bows for the bigger pumpkins and smaller bows for the smaller pumpkins. These bows help complete the pumpkins and helps hide where the stem and the leaf meet.
That’s all there is to making these adorable Embroidery Hoop Pumpkins! Which colors or patterns will you choose to match your home?