
This Minecraft Block Craft is an awesome 3D craft that can be displayed as Minecraft art on a shelf or even hung on a wall. The great thing about this craft, is that it fits the nature of Minecraft so well and you’re able to make any character from Minecraft using these wooden blocks.
The group I made these with loved how they turned out, and were super proud of their creations! My oldest daughter can’t wait to make several more of these so she can display her favorite characters in her Minecraft themed room.

This post may contain affiliate links. See our full disclosure policy HERE.
I recently got to teach a really cool class at our homeschool co-op called Minecraft Crafts. I had to come up with some Minecraft themed arts and crafts for kids ages 7-9 to make each week. This idea for this Minecraft Block Craft came to me, but I wasn’t actually sure it was going to work out the way I envisioned it in my head. Much to my surprise, I didn’t hit a single hitch and my plan worked!
I will give you a supply list and a step-by-step tutorial below with pictures, so ready through all of it, or pin this post on Pinterest to save the instructions follow along later. I also made a printable template for the kids to follow to make it easy to create the characters if you want to print that to use, it’s available for free HERE.
Minecraft Block Craft
You will need:
(64) 1×1″ wooden blocks (per character)
(16) large rubber bands
Acrylic paints in the colors needed for your character (I used the $0.50 paints from the Walmart craft section)
Wood Glue (I used Gorilla brand wood glue with a precision tip)
Paintbrush
Printable Minecraft Character Template

The first thing you’re going to need to do to make this Minecraft Block Craft is to set aside 64 wooden 1″ cubes. Then you need to paint them according to the printable diagram. The easiest way we found to do this for kids was to go through and count the number of blocks per color for the character they wanted to create and then write them down on a sheet of paper. They painted one color at a time.
Make sure to paint a thin coat of paint, or it will take a long time to dry. I had the kids paint every side of the cube, except for one, which would be the side that went on the back. A little paint goes a long way.
IF YOU LIKE THIS, CHECK OUT MY PRINTABLE MINECRAFT VALENTINES HERE!

When all 64 blocks are painted, you’re ready to start assembling your Minecraft Block Craft. Do one line of the character at a time. Line the 8 blocks up in the right order, with the un-painted side facing you. Then slip a rubber band over the top (carefully, because it stinks when you aren’t careful and it flips blocks everywhere), make sure the blocks are then lined up so that the long sides are as flat as possible, and then flip it up-right like the picture above.

Then just keep your lines in order, so you don’t mess up your design.

Once you have all your lines rubber-banded, you’re ready to start gluing your Minecraft Block Craft together. Use wood glue, and start with the top line of your character. Run a line of glue along the inside of the row and then press it firmly to the next line. Use your fingers to wipe off any glue that seeps up through the cracks. Wait about 15-20 seconds while you hold it to let the glue set a bit, and then glue that section to the next line.

When you have all the rows glued together, you need to use rubber bands to band it together vertically, like you did horizontally. It should look like this when you’re finished. I used the tighter rubber bands on the vertical section to hold it together tightly.

Flip it over, and then dab a little wood glue on any of the area you see gaps. The glue will dry smoothly, but will ensure you have a strong finish and don’t have wiggly blocks. Let it dry for 4-6 hours or overnight before removing the rubber bands.

This is what the finished product looks like. It’s not absolutely perfect (which I actually love) because each block isn’t perfect and each one is painted individually so there are some flaws. At this point you can leave as is as sit it on a shelf etc, OR you can attach a hanger to the back to mount it on the wall. They’re light, but sturdy. I’m in love with how they turned out!

One of the girls made a StampyCat Minecraft Block Craft (one of the characters included on the free printable diagram sheet) because she’s a big fan of his YouTube videos. It turned out great!

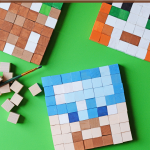
Another girl made this Minecraft land block for her Minecraft Block Craft. It turned out awesome! I love all the texture in this design.
So there you have it. That’s how you make a Minecraft Block Craft. Get creative and make your own designs once you get the technique down. We used THIS set of 500 blocks I found on Amazon to make these and they were really affordable. Which character will you make?