
Recently I made THE MOST ADORABLE No Bake Rainbow Cheesecake and started experimenting with colors. These are so simple and gorgeous!

This post may contain affiliate links. See our full disclosure policy HERE.
This No Bake Rainbow Cheesecake is great for birthday parties, baby showers, St, Patrick’s Day or really anytime you want to make fun dessert (and even kids can help!). Rainbow colors are so much fun to bake with that I try to incorporate as much color in my food as possible. Food should be pretty, right?
If you want to make a no bake cheesecake just for St. Patrick’s Day, check out these St. Patrick’s Day No Bake Cheesecake!
WANT ANOTHER RAINBOW RECIPE? MY RAINBOW SPRINKLE COOKIES ARE DELISH!
No Bake Rainbow Cheesecake

First you will need to mix the shortbread cookies and the butter together. Blend the heck out of the cookies in your food processor. You can also smash them in a bag with a rolling pin, but the blender was easier for me. It’s going to look like way too much for six little molds, but it isn’t. Spread it out evenly, and then press it down firmly with your hands.

After you mix the cheesecake ingredients together, your will split it up and add color. I used super concentrated gel coloring. I only stuck the end of my fork in the color, then used that fork to mix the color into the batter. Worked awesome. You can get the gel at Walmart in the wedding baking section, or on Amazon HERE. Layer the No Bake Rainbow Cheesecake batter into the cups. Start with one color, and use a spoon to pour it in. Don’t worry if it’s thin, it turns out fine!

It’s also very important that you use THIS PAN I found on Amazon. You can use other silicone pans, but this batter will fit perfectly in this pan. You can also make this in a regular pie pan, but you will need to double the recipe. This picture is blurry, because I was shooting with one hand while trying to show you how it works with the other, but I wanted you to see how easy these come out. Your crusts may leave some of their substance in the bottom, but it’s fine. I removed mine from the freezer after 2.5 hours, and I just turned my silicone pan inside out like the picture shows and pushed and every single one came out fine.

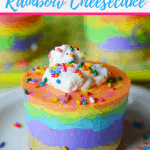
I plopped a little whipped cream on top with some rainbow sprinkles for the No Bake Rainbow Cheesecake and it turned out so cute! See how the sides kind of have swirls? So keep in mind that the SIDES are the only parts that will show on the outside of the cake. So make sure when you’re layering you don’t just pour in the middle.

These would be great for kids to help with too! These would be amazing for a rainbow baby shower, a rainbow themed birthday party, or JUST BECAUSE COLOR IS AWESOME!

So I said earlier I made a Patriotic version of this No Bake Rainbow Cheesecake using the same recipe. I just layered red first, then un-dyed white second and topped with blue. I added some whipped cream and some red, white and blue sprinkles to the top to finish it off as well.
CHECK OUT MY PATRIOTIC FRUIT SALAD FOR ANOTHER RED WHITE AND BLUE FOOD IDEA!

These ones are perfect for Memorial Day, President’s Day, Fourth of July, Veteran’s Day, or really any holiday where we focus on America!

I also made these Christmas themed ones as an easy holiday dessert. My oven was being cranky this year, so I decided I’d make something no-bake and I love how these turned out!

I just layered green, un-dyed, and red batter and then added some whipped cream and Christmas sprinkles on top! Easy, fast, and delicious!

If you don’t need Christmas themed dessert, you can always have winter themed dessert! These look so elegant and pretty, no one will know they only took you 20 minutes!

These are great for a winter themed birthday party, for a snow day, or really just as an excuse to eat cheesecake during the winter. I layered a darker blue on the bottom, white in the middle, and a lighter blue on top with some whipped cream and snowflake sprinkles.

Valentine’s Day is also a great holiday for these! No baking, cute little individual servings, and festive!

I layered red on the bottom, un-dyed in the middle, and bright pink on top with some whipped cream and Valentine-themed sprinkles! Aren’t they cute?
NO matter what colors or theme you choose for your No Bake Rainbow Cheesecake, I’m sure they’ll be adorable! Which colors will you choose?

No Bake Rainbow Cheesecake
No Bake Rainbow Cheesecake is the perfect dessert for any holiday or party theme!
Ingredients
- 12 Shortbread Cookies (we used Keebler brand)
- 1 Tablespoon melted butter
- 1 packet unflavored gelatin
- 2 Tablespoons of cold water
- (2) 8 ounce packages of cream cheese, softened
- 1/2 cup sugar
- 1/2 teaspoon lemon juice
- 1 teaspoon vanilla
- Pinch of salt
- 1/2 cup heavy cream, at room temperature
- 1/2 cup Sweet Cream Creamer, at room temperature
- Concentrated Gel Food Coloring
- Whipped cream (optional)
- Sprinkles (optional)
Instructions
- Use a food processor to turn your shortbread cookies into crumbs.
- In a large bowl, mix the butter and shortbread crumbs together with a fork.
- Place your silicone baking dish on a cookie sheet and then spoon the crumb mixture into the six silicone cups. Spoon it in evenly and then smash it down firmly with your fingers.
- In a separate bowl, pour in the packet of gelatin.
- Add the cold water to the gelatin and whisk until mixed thoroughly.
- Set the bowl aside and let the gel harden (this will take a few minutes)
- Use an electric mixer and beat the cream cheese in a mixing bowl until it’s smooth.
- Add in the sugar, lemon juice, vanilla and salt and mix until well combined.
- Microwave the hardened gelatin for about ten seconds.
- Slowly add in the room temperature creams into the cream cheese mixture while your electric mixer is running.
- Finally pour the gelatin into the cream cheese mixture and use the electric mixture to mix it in.
- Divide your cream cheese mixture into as many bowls as you want colors.
- Use a concentrated gel food coloring to achieve the color you want. Do not use liquid. I simply dipped my mixing fork just into the tip of the food dye mixture to achieve the colors pictured.
- Pour the cream cheese mixture in, one color at a time, on top of the crusts in the silicone pan. Remember the edges are what’s going to show the color, so don’t just pour into the middle.
- Fill each mold to the top.
- Place on a flat surface in the freezer uncovered for 2-4 hours.
- Remove from the freezer for 30 minutes before serving.
- Top with whipped cream and sprinkles to finish.
Nutrition Information:
Yield:
6
Serving Size:
1
Amount Per Serving:Calories: 483Total Fat: 35gSaturated Fat: 19gTrans Fat: 1gUnsaturated Fat: 12gCholesterol: 84mgSodium: 298mgCarbohydrates: 37gFiber: 0gSugar: 26gProtein: 6g