
This Rainbow Art DIY is so simple to make, and makes such a statement on the wall! I had looked at some similar designs on Etsy, but for the size I was wanting to purchase, the price was going to be over $100 shipped! I’m frugal, so I decided to come up with a way to make my own.
Now that I’ve devised my method on how to make this Rainbow Art DIY, I’m going to show you how I did it so you can make your own too! These are beautiful wall art for a classroom, a nursery, a child’s room, a play room, or really anywhere you just want to brighten up with color!

This post may contain affiliate links. See our full disclosure policy HERE.
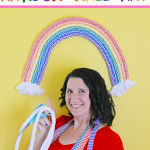
This Rainbow Art DIY is much bigger than it looks in the picture. If you scroll down, you can see me standing in the middle of the bottom of the rainbow, so it’s a great feature piece! This tutorial is easily customizable, so if you want one that’s smaller, you can tailor it to your ideas.
Rainbow Art DIY
Rainbow Art DIY Supplies:
Braided Cotton Rope (I use this exact bundle I found on Amazon and it was perfect)
Ribbon in rainbow colors (I used a multi-pack from Amazon that’s a chevron grosgrain ribbon, but it’s no longer available, but these beautiful solids are.)
White string or mini white rubber bands (like you use in little girls’ hair)
White Ribbon
Hot glue gun
Scissors

The first step for making your Rainbow Art DIY is to cut the ropes to the correct length. If you want to do your rainbow the same size I did, I cut my ropes in these lengths: Then, use your string, or mini rubber bands (I started with string and then switched to the mini white rubber bands because it was easier) to make sure your entire robe doesn’t fray. I left a tassel of about 2-3″ at the end, which I purposely unraveled with my fingers.
WANT ANOTHER DIY DECOR IDEA? CHECK OUT THIS BOOK BANNER I MADE WITH LITTLE GOLDEN BOOKS FOR HER ROOM TOO!

Next, you’re going to be adding the colors to your rope. I used chevron ribbon in very basic rainbow colors, BUT you could do them in brighter colors with pinks and neons, or more muted pastels, or even do an ombre effect etc. I glued the starting end at the base by the tassel, then started wrapping like this. I wrapped 5-6 times, and then would add a little hot glue to the ribbon, then wrap 5 or 6 more times, until I got to the end. Once you get to the end, glue the very end of the ribbon and press it down.
Some alternate ways to get color for your rainbow art DIY:
- Use colored rope instead of white. (I didn’t use this option, as it as more costly.)
- Dye your white rope using fabric dye. (I didn’t use this option because it seemed more messy and time consuming.)
- Use yarn instead of ribbon. (I didn’t use this option, because I’ve done something similar with a wreath and it takes FOREVER with yarn.)

This is the picture I referred to earlier when I said you could tell the actual size of this rainbow better when I’m standing between it. It’s very large!
When you finish all the colors on your ropes, you’re ready to attach them to themselves. I started with the shortest rope (purple) and moved up from there. All you need to do to attach these to themselves is hot glue them to themselves. I started by gluing the purple to the blue, then the purple and blue combo to the green and so on and so forth.
Start at the base by the tassels, and run a bead of hot glue a few inches long along the rope, and then press the ropes together firmly for about ten seconds to make sure they’re secure before moving on. Continue gluing several inches at a time, and it should go by pretty quickly.
EATING RAINBOWS IS FUN TOO! MAKE THESE NO BAKE RAINBOW CHEESECAKES!

After I attached all my ropes to each other and they formed this pretty rainbow art, I needed a way to be able to attach it to the wall. If you feel like your Rainbow Art DIY is too flimsy at this point, you can glue felt onto the full back of the wall hanging, before moving to the next step, and it will make it much sturdier. Mine was fine so I left it as is.
I cut a piece of white ribbon that was 8″ long, and placed it like so in the top center of the rainbow for easy hanging. I secured the ends of the ribbon to the back of the hanging using hot glue. Wait 10 minutes before hanging to allow the glue to dry and set properly.

Once it’s fully dry, you can hang your wall art on the wall to enjoy! I love how it looks on in my daughter’s room on her cheery yellow walls! This would also be fun using fabric scraps cut into strips for an alternative color option. Don’t the frayed ends look like fluffy little clouds? I also have a SUPER cute Little Golden Book flag banner I made for her room as well, that you can see the pictures of HERE. It’s one of my favorite home decor DIY things I’ve ever made…probably because I’m so partial to Little Golden Books haha.