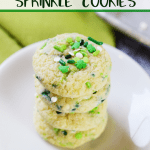

I love making special treats for the holidays! St. Patrick’s Day has always been a favorite in our family because, you know, pinching. BUT it’s also super fun to wear green and make all your regular food green for a day! These St. Patrick’s Day Sprinkle Cookies are soft and delicious and a perfectly green!
They’re a LITTLE more fussy than regular sugar cookies, but the flavor is incredible and they bake super fast. I’ve used this recipe for a long time, and it’s my favorite for sprinkle cookies!

This post may contain affiliate links. See my full disclosure policy HERE.
St. Patrick’s Day Sprinkle Cookies
In the recipe below, you will note that I give you a few steps where you chill the cookies before baking them. This is a super important step. If you skip it, your cookies will get big and flat and end up kind of crispy, and not in a good way. I never have time to refrigerate, so I just stick mine in the freezer, because it works the same and is 75% faster.
These would be great to send with your kids in their lunch boxes on St. Patrick’s Day as an after-lunch sweet treat!
YOU COULD ALSO MAKE MY RAINBOW SPRINKLE COOKIES TOO!

The best thing about these St. Patrick’s Day Sprinkle Cookies, in my opinion, is that they not only have sprinkles on top, but they also are totally full of sprinkles in the cookie itself too! The texture is fantastic. Finding St. Patrick’s Day sprinkles turned out to be a little harder than I thought. I ended up buying a gigantic container on Amazon, and the sprinkles are DARLING and I’m so glad I got them. You can get them yourself HERE. Make sure to put the extra sprinkles on top for the best color results too.

This recipe will make about 32 cookies. You will likely need to cook them in two separate batches, depending on the size of your oven. DO NOT OVERCOOK THEM. You’re going to want to, but you really need to resist. Just follow the recipe, and trust me.
So, to recap:
- Don’t skip the chilling step.
- Don’t forget to add an extra pinch of sprinkles to the top before baking.
- Don’t overbake.
YOU COULD ALSO MAKE MY RAINBOW SPRINKLE COOKIES TOO! THEY’D BE PERFECT!

St. Patrick’s Day Sprinkle Cookies
These St. Patrick’s Day Sprinkle Cookies are the perfect little green cookie to celebrate the holiday with!
Ingredients
- 1 3/4 cups flour
- 1/2 cup corn starch
- 1/2 teaspoon baking powder
- 1 teaspoon cream of tartar
- 1/2 teaspoon baking soda
- Pinch of salt
- 3/4 cup butter, softened
- 1 cup sugar
- 1 teaspoon vanilla
- 1 teaspoon almond extract
- 1 egg
- 1/2 cup St. Patrick’s Day (or green) sprinkles
Instructions
- In a mixing bowl, mix the butter and sugar together until fluffy.
- Add in the egg, vanilla and almond extract and whisk again until mixed.
- In a separate bowl mix together the flour, corn starch, cream of tartar, baking soda, baking powder, and salt until mixed well.
- Add in the dry mixture to the wet mixture slowly, mixing with a fork to combine.
- Add in your sprinkles and mix them in with your hands or a fork.
- Stick the mixture in the freezer for 30 mins.
- Roll balls that are about an inch wide and place them on a cookie sheet, leaving an inch of space between each cookie. They will be sticky, but go fast and you’ll be fine.
- Do not smash the cookies down.
- Add a pinch of extra sprinkles to the top of each cookie ball for brightest color when they’re done.
- Cover them with plastic wrap or Glad Press N Seal and place in the fridge for 4 hours, or overnight, or in the freezer for an hour.
- After they’ve chilled, bake them at 350 for 10-13 minutes.
- The cookies will JUST look done on the edges. Don’t overcook. The cookies will not become golden brown.
Notes
- Don’t overcook these! They won’t get golden brown when they’re done. Pull them out and they will continue to bake on the pan with the residual heat from the oven.
- Don’t skip the freezing step or they won’t turn out right.
- Make sure to add an extra bit of sprinkles to the top of each cookie so the color from the sprinkles pops.
Nutrition Information:
Yield:
16
Serving Size:
2
Amount Per Serving:Calories: 254Total Fat: 12gSaturated Fat: 6gTrans Fat: 0gUnsaturated Fat: 6gCholesterol: 35mgSodium: 137mgCarbohydrates: 35gFiber: 0gSugar: 18gProtein: 2g